Wednesday, December 29, 2010

Nest Tree Topper


Erm...hi. It's been a while. I won't bore you with stories of dead computers and overbooked schedules. Suffice to say, I've missed this space and sharing my projects here. I have been sewing and crafting a bit this fall, which I'll try to share when I can. Thanks, Larissa, for the kick in the pants I needed to post this little project.

Okay, so I've needed a tree topper for a few years now. I've made do with a bow of one sort or another, but that is so not my style, really. Last year I hemmed and hawed over a lovely glass and iron piece just long enough to miss it entirely when other more decisive people bought them all up. I have been intrigued by Anthropologie's nest tree toppers for a couple of years now, but completely flabbergasted by the insane price tag (what are they thinking???).

So, on a whim this year, unwilling to compromise and stick yet another bow on my topperless tree, I headed down to my local craft shop, picked up a few supplies and knocked out my own woodsy, nesty tree topper. I kept it pretty simple, with future plans to add more bits and bobs later.

I started off with a plain, straw, floral wreath, which I spray painted silver, then dusted lightly with ivory spray paint to soften it up a bit. Bits of straw fell off as I worked, leaving some of the natural straw color showing through. I liked that.


Then there was this lovely, dark gold, glass garland...


...which I wrapped loosely and evenly around the wreath, securing the ends on the inside with hot glue, like so: 


Next came bunches of lovely, green moss, around the top of the wreath, again, hot glued down. 


My "woods" consisted of a bunch of sparkly, silver-gold, floral picks (similar to eucalyptus branches) that I pulled apart. With a metal skewer, I poked holes into the wreath in random spots, filled the holes with hot glue, then stuck the shiny, little branchlets in securely. 


Finally, with the addition of a few pieces of real lichen and a small nest (dusted with silver paint and occupied by some of the leftover moss and a sweet little bird), my nest tree topper was done. For this year, anyway. Next year's goal: find the perfect paper mache, wooden, or ceramic mushrooms to add to my little woodland scene. And maybe a few more birdies. Or maybe I'll just leave it as is...
Wednesday, August 11, 2010

put together a beginner embroidery kit


I have had so much fun over the past week putting together this beginner embroidery kit for a very special little girl celebrating her 8th birthday. It was a bit of a risk - what if she's not interested? - but I decided to take the chance. I mean, she's in the direct line of craft greatness, so she's got to be interested, right? If not now, then someday. And when she feels that pull, she'll be prepared. 


It all started with this book by artist Helen Dardik, which was the first I came across when looking for a simple, easy and engaging instructional book for the beginner embroiderer. Quite serendipitous, I thought, considering this little girl's mother is already a big Dardik fan.

[I now interrupt this post to slap myself in the forehead really hard. 

I just headed on over to mmmcrafts for a link to where I know I've seen her mention Helen Dardik more than once, when I find this. That's right. She has the book. ARRGGG. I guess now you don't have to share your copy with the girls, Larissa. And in case you've already created and posted about an embroidery kit for them and I've just forgotten that as well, please don't remind me. 

grumble grumble grumble...]

Okay, so, the first step in creating a beginner embroidery kit is to find a good book with clear instructions, detailed pictures, and inspiring projects. Preferable one that the giftee does not currently own or have ready access to by walking down the hall. This Dardik book is a good one. (Jenny Hart can also be relied upon for modern embroidery patterns that range from sweet to subversive. Her book Sublime Stitching is great, too.) Check out a couple of these cute projects from Embroidery for Little Miss Crafty


Next, I included the basics: a 4" embroidery hoop, embroidery scissors, a few fat quarters (a couple of fun prints and a basic white) and a selection of embroidery thread in bright, girly colors. 


Now for the fun part. A simple sheath for her scissors (made from fabric purchased here during a recent trip to Austin that I hope to post about soon.): 


A needle case stocked with nice, new sharps and a few of my favorite vintage buttons: 


And a pin cushion: 


I knew I wanted to include a felt pin cushion, and that it should be something youthful and whimsical. I was inspired by the owl fabric and remembered AMH's owl ornament, so I started there with her pattern, but ended up resizing the body, then scrapping her wings and eyes and redesigning my own, and adding the breast piece. If you want to recreate this pincushion, I'd direct you to her pattern, then suggest that you tweak to your tastes like I did and stuff it a good bit fuller than you would for an ornament. 


I placed all of these goodies in a perfectly sized, apple green suitcase (similar to these) from Kate's Paperie in NYC. I had tucked it away since my trip there last year, knowing that it would find its ideal purpose eventually. 

And, finally, Gage wanted in on the sewing and gifting action, so he sat down and knocked this out for his little friend: 


I tried to convince him to stitch "Hereto I plight thee my troth" but that was a no-go. In the end, he went with a simple monogram. Probably the better choice. 

Monday, August 2, 2010

simple summer stone fruit cobbler


I love cherry season. As a family, we generally consume about 25 pounds in a span of two or three months. (I'm not telling how much of that I'm personally responsible for. Ahem.) This simple cobbler is one of my favorite ways to eat cherries. It's also a great way to use all of those other yummy summer stone fruits, like peaches, nectarines and plums. This recipe is kind of a cheater cobbler: still from scratch, just without all that dough making, rolling and cutting. Perfect for surprise guests or afternoon cravings. 


Summer Stone Fruit Cobbler

Batter: 
1/4 cup butter (That's right. Real butter. I said it was simple, not healthy)
1 cup flour
1/2 cup sugar
2 teaspoon baking powder
1/2 teaspoon salt or to taste
1 cup milk
1/4 teaspoon vanilla

Fruit: 
~ 1 1/2 to 2 pounds of the stone fruit of  your choice 
1 tablespoon cinnamon
1/4 cup brown sugar

Prep your fruit, first, by washing it really well. If you're using peaches, nectarines or plums, remove the stone and slice your fruit. (I don't peel my fruit for this recipe because I like it to be a bit more rustic. Plus it's prettier. Suit yourself on this.) If you're using cherries, spend the next hour laboriously cutting and pitting the little wretches OR you could do like I did and buy yourself one of these handy little kitchen wonders and be done with pitting in mere minutes: 

( I did the Snoopy Happy Dance when I first used this)

Okay, fruit cleaned, pitted and sliced (except for the cherries, which I leave whole), toss it into a bowl with the brown sugar and cinnamon. Use your hands to mix well, coating each piece of fruit with the sugar mixture. (If I don't have time to let my fruit sit for a while, I massage it a bit, especially the cherries [really, I come pretty close to crushing these], to get the juices flowing really well. If you can let the peaches, nectarines and plums sit in the fridge for a couple of hours, they'll get juicy on their own.)

Preheat your oven to 375. I really like to use a well seasoned, cast iron skillet for this cobbler. The advantage is that it will give your cobbler a beautiful, crunchy, delicious crust. Totally worth the extra effort. 

Melt your butter on the stove top in the cast iron skillet while you mix the batter. You want the skillet hot and the butter melted and swirled around the edges of the pan to coat the bottom and prevent the batter from sticking. Be careful not to burn the butter - if you're nervous about the multitasking, just wait until your batter is mixed to heat your skillet and melt the butter. You could also let your skillet heat up in the oven as it preheats, then take it out to melt the butter once your batter is mixed. 

Now for the rest of the batter. This couldn't be easier. Blend the flour, sugar, baking powder, salt, milk and vanilla well with a whisk and pour over the melted butter in the skillet or baking dish. Very important: do not stir. Distribute the prepared fruit gently over the batter, again without stirring. 

Bake for 40 minutes, until the batter is starting to turn golden brown and crisping around the edges. Serve your cobbler hot out of the oven with ice cream or freshly whipped cream, if you like. Or, just as good, straight out of the fridge the next morning for breakfast. 


Friday, July 30, 2010

learn a new art

Tie-Dye Shibori Vessel
Did you know that, in addition to a staggering array of quality art supplies, Dick Blick also offers free art lessons? Geared toward school agers, these lessons turn otherwise intimidating processes, like silk screening, Secco or Shibori, into something a little less daunting - something even your kids could do - with the aid of printable pdf's and video tutorials. Plus, I know that when I browse through Blick's products, there are so many that intrigue, but I wouldn't know how to start using them. Each project links to the supplies needed where - imagine this - they can easily be purchased from Dick Blick! (This is not a paid endorsement.)

Try it. Who knows - your inner fresco-ist may have been waiting for an opportunity just such as this. Oh, and I guess you could also share these ideas with your children. If you're so inclined.

Wednesday, July 21, 2010

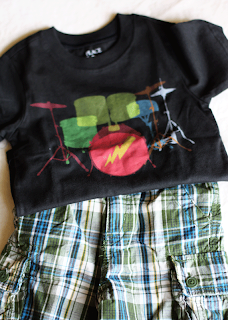
90 minute shirt trial run


So here is my first attempt at making made's 90 minute shirt. I used a super soft, butter yellow shirt of mine for the main body and a faded chambray tee for the trim and pants (which I just serged at the cuff but will definitely be going back to hem - it will just look better, plus they're a bit long, too). Since I used a ladies' medium tee, I didn't have enough fabric for sleeves. Hence the muscle tee. I bound the arm holes using a method similar to this one from another tute. This first run turned out a little big, so I'll scale it down a bit next time. 


This set was created as a wearable muslin, but after all that work I decided to embellish the shirt a bit anyway with a patch of my precious Kokka that I've been hoarding to use in a quilt for Ash one of these days. I made the patch by fusing some sewable Wonder-Under to the back of the fabric, cutting the patch shape out, then serging the edges. (I could have skipped the last step. I was feeling experimental.) Patch made, I removed the paper backing, eyeballed the placement, ironed it on and top stitched it down.  

Drafting my own tee shirt pattern was confidence building and really pretty easy. Plus I have a HUGE stack of discarded tees to work with, so this is perfect. Thanks, Dana! 

Thursday, July 8, 2010

jam and bread


My kids eat peanut butter and jelly sandwiches for lunch almost every day. I had a pediatrician tell me several years back that daily PB&Js are just fine. At the time, I wasn't necessarily looking for affirmation, and I'm usually one to question any outside guidance regarding my kids, but considering how much easier this particular indulgence makes my life, I accepted the advice blindly and haven't looked back. So, that's how we've rolled for a while now but I have tried to keep our PB&Js a bit more on the healthy side, even more so lately with homemade bread and jam.

Enter Healthy Bread in Five Minutes a Day. If you have any interest whatsoever in trying bread making, but are intimidated by the process, I highly suggest that you check it out. The basic idea is that you mix up the bread (no kneading!), let it rise, then stick it in the fridge until baking day. When it's time to bake, take a hunk off the dough, shape it into a loaf, let it rest, bake it. Hands on time is literally about 5 minutes for the mixing and 5 more on baking day. Depending on the recipe you choose, you'll get 2 to 4 loaves out of every batch. The recipe I use for sandwiches is the Soft Whole Wheat Sandwich Bread, but I also like the whole wheat bread made with olive oil, both for loaves and for pizza dough. Seriously, folks, this is bread making at its simplest.

Then there's the jam. I have planned for years to learn canning so that I can line my pantry shelves with jars of homemade soup, homegrown (or at least locally grown) veggies and my own jams and jellies that actually taste like the fruit for which they are named. (The grandmothers were pro canners and food preservers.) This will be the summer. I am committing. 


My first attempt: Ponchatoula Strawberry freezer jam made from berries that we picked at a local organic farm. Freezer jam is the gateway to true canning and preserving. So easy, so delicious, so addictive. And so fun when you can pick the berries yourself! 

Here's the basic recipe, adapted from the one on the back of the Ball Freezer Jam Pectin box:

1 packet freezer jam pectin
1 1/2 cups sugar
4 cups crushed strawberries (I skipped the crushing and used my food processor)
1 tablespoon lemon juice
clean jars & lids

Mix the sugar and pectin thoroughly in a large bowl. Add your crushed or otherwise processed strawberries and lemon juice to the pectin mixture and stir for about 3 minutes. Pour the strawberry mixture into clean jars, leaving about 1/2 inch head space, and close the lids. Let the jars stand for 30 minutes or so until the jam thickens, then stick one in the fridge and the rest in the freezer. 

I love that this recipe only calls for 1 1/2 cups sugar. Most jam recipes that I found called for 3 cups per pint of strawberries!Yikes. And this stuff tastes so fresh and summery. You must try it. My favorite way to indulge: a slice of homemade bread spread with cream cheese and topped with strawberry jam. Like cheesecake for breakfast.

As far as the peanut butter goes, I just buy a ready made organic variety. I guess I should look into making my own...maybe next summer. So there you go - healthy peanut butter and jelly sandwiches. Really pretty easy and soooo good.

On a separate note, I have been crafting some over the past few months, little bits here and there. Getting around to blogging about my projects hasn't happened though, obviously. Living before blogging, right? I'll try to get a few things posted soon.

For now, I'll leave you with a gratuitous baby picture.

Monday, May 31, 2010

birthday love from Atlanta


 Just right 1st birthday gifts for Asher...


The reaction: 


Lucky, lucky us!

Oh, and by the way, Larissa, I just added the movie to my queue, so we'll see if it still holds the same allure now as it did when I was a kid. Popeye didn't fail me, so I have high hopes. 

Wednesday, May 26, 2010

simple top for girls of all ages


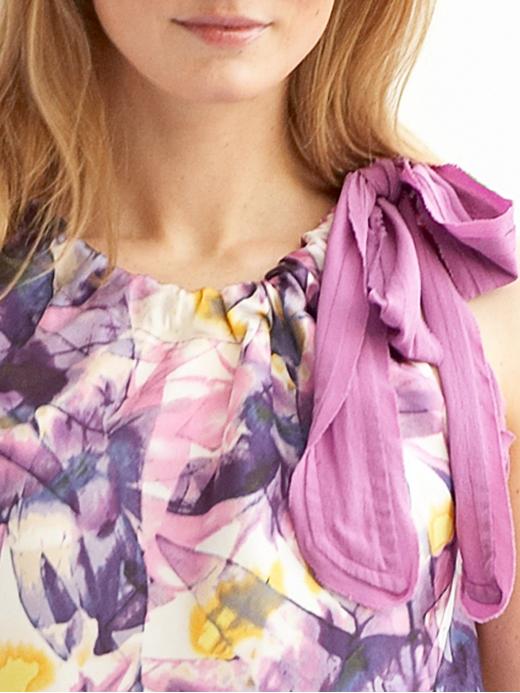
Here's an easy top I made for Aud last summer, but never got around to posting. I used this tutorial, which was super simple and straightforward, for the basic construction, adding a band of contrasting fabric along the bottom.

Image courtesy of Banana Republic

I was reminded of it recently when I saw this lovely, grown up version. Who'd have thought? Doesn't it look like a variation on the simple pillowcase dress that so many folks have made, including myself? Never really thought of making an adult version, though. I may have to go find myself some printed silk...

Friday, May 7, 2010

whether you're a mother or a child or ever were a child with a mother...


Here's a poem for you...


The Lanyard by Billy Collins

The other day I was ricocheting slowly
off the blue walls of this room,
moving as if underwater from typewriter to piano,
from bookshelf to an envelope lying on the floor,
when I found myself in the L section of the dictionary
where my eyes fell upon the word lanyard.

No cookie nibbled by a French novelist
could send one into the past more suddenly—
a past where I sat at a workbench at a camp
by a deep Adirondack lake
learning how to braid long thin plastic strips
into a lanyard, a gift for my mother.

I had never seen anyone use a lanyard
or wear one, if that’s what you did with them,
but that did not keep me from crossing
strand over strand again and again
until I had made a boxy
red and white lanyard for my mother.

She gave me life and milk from her breasts,
and I gave her a lanyard.
She nursed me in many a sick room,
lifted spoons of medicine to my lips,
laid cold face-cloths on my forehead,
and then led me out into the airy light

and taught me to walk and swim,
and I, in turn, presented her with a lanyard.
Here are thousands of meals, she said,
and here is clothing and a good education.
And here is your lanyard, I replied,
which I made with a little help from a counselor.

Here is a breathing body and a beating heart,
strong legs, bones and teeth,
and two clear eyes to read the world, she whispered,
and here, I said, is the lanyard I made at camp.
And here, I wish to say to her now,
is a smaller gift—not the worn truth

that you can never repay your mother,
but the rueful admission that when she took
the two-tone lanyard from my hand,
I was as sure as a boy could be
that this useless, worthless thing I wove
out of boredom would be enough to make us even.

(You should really listen to Billy Collins read this poem himself here.) 

Happy Mother's Day to you all, and especially to you, Mom. Can't wait for you to get here so I can tell you in person. 


Tuesday, April 27, 2010

hello mummysam, i love you

I was just browsing Flickr for some wall art inspiration for Audrey's room when I came across these:

new wall art by mummysam.
photos via mummysam's flickr

What?! Love them. And, apparently just about everything else this inspired crafter does. Maybe you've heard of mummysam, but I had not. I foresee many hours of poring through her archive... (yay for nursing breaks)

And we're all in luck - looks like she's got a book coming out this fall that's available for pre-order here. Can't wait to get my greedy little craft-book-obsessed hands on it.

the front cover of my upcoming book! by mummysam.
photo via mummysam's flickr


Ha - just found this. So true. 

Wednesday, April 14, 2010

aaaaaaaaaahhhhhhhhh...


I'm breathing a HUGE sigh of relief over here. What you may not have noticed is that my entire crafting life (aside from these little guys) has been put on hold since, oh, around October, when I started making this quilt for my bff, Larissa. For her birthday. Her December birthday. Right.


The front is made up of completely improvised, scrappy, log-cabin-ish squares. The back is pieced with leftovers, with a nod to the stacked coin quilt, which I'd originally planned to make for Larissa, until she wrote this post back in July. (A sane person might have taken that post as practically divine confirmation that that was the way to go. I, on the other hand, freaked out thinking that she, being the crafting whirlwind that she is, would make one herself that would far outshine my own in about a tenth of the time, and so changed my plans immediately. Then proceeded to hem and haw over design, fabric, etc. for the next 3 months, thereby killing any head start I might have had on actually finishing the dad burn thing in time.) 


Okay, other details. Basted using this pinless technique, which I loved. Quick and tidy. Quilted in the ditch on the log cabins then in large, irregular, concentric squares around those. Made my bias tape using this tute, which, good grief, makes a lot of tape, then bound the quilt by hand using a similar method to the one described in this book. 

So, anyhoo, it's done. Not my craft opus, which might justify its almost 4 month overdue arrival, but made with love all the same. Hope you like it, Larry.

Related Posts with Thumbnails